.

I had purchased charm packs to make the yoyos. The pattern recommended using a Clover Yoyo Maker but yoyos are so simple to make.

Using a template a circle template (I recycled some lids from empty margarine tubs) and cut two sizes. The larger being the outer circumference of circle and the slightly smaller one being the fold line where you will make your running stitches. In the case of this yoyo, the outer circle is 4 1/4 inches across and the inner circle is 3 3/8 inches across, which will create a finished 1 3/4 inch yoyo.

On the right side of the fabric, trace the larger circle template on the 5 inch square and center the smaller circle template in the larger circle. Using the larger circle marking, cut out the circle.

Note: I am using a Bohin mechanical pencil. I initially got the pencil because tradition mechanical pencils tends to skip and drag the fabric when marking it. The Bohin pencil uses ceramic lead which is much smoother than tradition lead. And I just recently found out that the ceramic leads are used with water-soluble dyes and can be removed with water!!! How fabulous! I tried it and to worked! These pencils and the lead cost a little bit more, but, in my opinion, I believe that it's well worth the $$.
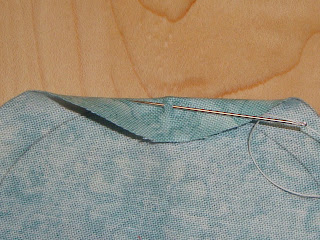 Once the circle is cut out, fold the fabric at the smaller circle marking with your fingers. The wrong side of the fabric should be facing you. First, make a knot in the end of the thread. Using the needle, take a small bite through both layers. Once the thread is pulled through all of the stitches, this back-stitch will help secure the knot, so it won't pull out. When placing the first stitch, insert the needle near the knot and start your stitches from there.


Using large running stitches, stitch at the fold at about 1/8 of an inch. I used hand-quilting thread because it is a little bit thicker than regular thread. Remember: The smaller stitches you use, the larger the hole in the center of your yoyo. If the stitches are to larger, it will look sloppy.


Stitch length somewhere in between. You may have to play with the stitch length until you feel comfortable with the size.

I'm satisfied with this one!

Once the stitches are all the way around your circle, pull the thread to cinch the gathers toward the center. This is where the thicker thread is a good idea. If you pull too tight, the thread may break and you will have to do it all over again.

TIP: When your stitches reach to where you started, you will need to carefully place your stitches exactly where you place the initial stitches- have the needle go in where the first stitch went in, and have the it go out where it goes out. I used red fabric in this example to show how it is done.

If you don't follow the these stitches, the stitches will show once the thread is cinched. If done right, you will not be able to see the thread and the thread color will not matter because you will not see it.
 |
Try to cinch the hold as tight as you can and make sure that it is in the center of your yoyo. Now, go right through to the back of the yoyo, going between the gathers so you won't see the thread.

You can place the knot on the back side of the yoyo because, usually, it will be appliqued to another piece of fabric. Not a good photo, but it will leave just a tiny spot on the back.

In my Yoyoville quilt, the yoyo will be appliqued to piece of 3 1/2 inch background fabric. Now I'll have to make 156 more!!
Until next time,
Jane
No comments:
Post a Comment